![]()
|
This Is IT... |
|
|
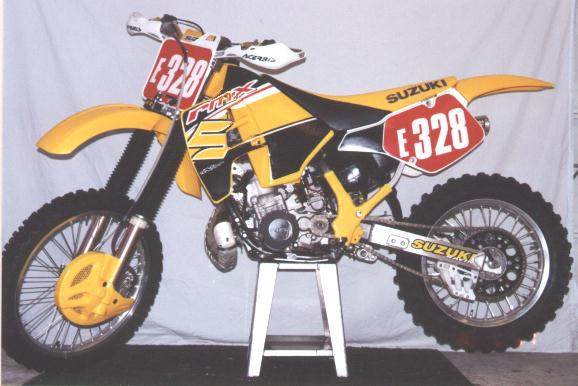
Patman's Old ride |
|
![]()
| This Was
one of my most favorite scooters, ever. But as a result of having to
streamline the 'ol finances recently, it became someone elses ride.
|
||
| I liked the RMX
for a variety of reasons, not the least of which is the fact that it comes
( for the most part ), ready to race right out of the crate. ( exhaust
pipe not withstanding ...it sucks )
But it does come with a wide ratio tranny. And a tank that now holds about 3.2 gallons of fuel. And, an o-ring chain, steel clutch plates, case guards, cam type chain adjusters, disk guards, lever / brush guards, & fork booties. The best thing though ( for a lazy guy like myself ), is the use of grease fittings in the swingarm / linkage area. How important is this? In the year that I've owned it, with about 2000 miles on it, I have yet to pull the linkage apart. And, it's as tight & smooth as the first day. All this adds up to a pretty reliable scooter that only needs some minor...adjusting, to make right. Stay tuned...as it were. |
||
|
Patman's '97 Suzuki RMX 265 |
What's a pain in the Butt? Stock, It's not the most powerful 250 on the planet, that's fer sure. And the seat is kinda soft, & not as flat as it could be either. And while the suspension may be fine for Enduro, High Speed X-Country work takes a stiffer set up. Like I said, Stay Tuned, & if ya got an RMX I'll be more than happy to fill you in on the fixes.
|
|
|
The Mods Well like I said, the Suzuki RMX 250 starts off as a great mount for the Enduro / Cross Country crowd. There is a good reason for that...this is the type of riding Suzuki had in mind, when they designed it a decade ago. No need for a bulbous tank, expensive tranny, aftermarket flywheel weight, or any of the really hard stuff, that's normally required for spirited Off-Road competition. There are however, some enhancements that must be made, that any bike needs to be competitive, & some that could be made...well, just for smileage. First things first. Suspension. We all know by now that a bazillion horsepower may move a mountain, but if that mountain has bumps on it you're screwed without suspension. And, by now we all know that proper suspension setup has to do with weight. So, the first thing I did to fix the suspension for me, was to remove the pipe. That's right, the pipe weighs about 300 pounds, and inhibits the type of power I like for X-country racin' so, off it went, to be replaced by an FMF Gnarly pipe, & Pro Circuit silencer ( more on this later ). Also in the diet program, were the removal of the lighting equipment, that was intended for enduro work. For your personal type of ridin' you may wanna leave some of this on. The front numberplate / light unit was replaced with a stock numberplate from an '89-'92 RM, along with the rear fender, & side panel / numberplates from the same year RM. Of course the odometer, & it's cable were removed, & the cable hole in the front odo drive unit, was plugged with a standard plastic plug available at the local hardware store, & secured with RTV. Now then, I knew that I was gonna add some weight to the bike, in the form of protective equipment, so Acerbis Rally Pro hand guards ( don't use the cheap ones, they won't work when ya need them ), a Works Connection Skidplate, Moose Racing Pipe Protector, & Maier Plastic Frame guards from the '89-'92 RM were installed. the Stock Steel Case / water pump guards were retained. At this point, with a full tank of gas, the RMX weighed just about what it would weigh during a race. Time then, to suit up in full gear & do race & static sag measurements ( this will be covered later as well ). My testing in the garage here, proved what I had already suspected, stiffer springs were in order on both ends...several steps heavier front & rear. As far as I am concerned, the only people to call for suspension service is Race Tech. Which I did. I told 'em what I had, what I'd found, & what I wanted, & in a couple of days, I had a new set of balanced, & matched springs for front & rear. In the mean time, I had pulled the shock & forks & when the springs arrived, I took the whole batch over to a Race Tech Center for Race Tech Gold Valve installation, front & rear. I've used the gold valve before, & it's tunability allows for a perfectly tailored setup. I called ahead, & let 'em know I was coming, so they could have the parts & proper suspension oil, on hand. It only took them a day to do the job, on both ends, & I came away with hardware that was set up for me exactly, & matched front & rear ( very important ). The next step of course is to set the sag on both ends. As the Race Tech folks supplied all the hardware ( valves, & springs ), They were able to give me an Idea of where to start on the front fork spring spacers, to achieve proper front end sag...yes there is such a thing as front end sag. Not just rear sag as some think. Remember, balance front to rear, is the key to proper steering, handling, & awesome suspension. Next? The practice track of course. Now, ya can't do this by yourself. So plan on bringing a friend, & don't let him / her bring there bike. This session is for testing, & testing only. For us Cross country riders a long section of whoops seems to be the best test. It took me half a tank of gas ( I kept it full all the time ), & about two & a half hours to get it right, but check my video on the nasty whoops for yourself. Now that's smooth ! I made pass, after pass, in the same section until Mike said both ends were stickin' to the ground like glue, without kickin' or bottoming ( more on this later as well). Remember to stop after a half hour or so & re-check the sag...( front & rear ), of the new springs. And don't forget that a break in time is in there as well, during set up, usually about an hour of ridin time, so don't be too drastic in your adjustments. The suspension will rebound quicker, & feel softer on compression after about an hour of ride time. In the end, I think I've got the best handling RMX on the Planet...right here in Texas ! A lot was hardware, true enough, but at least an equal amount of the suspension is taking the time ( & someone else's ) to do a proper setup. Next...Makin' it turn.
Once I got the bike to absorb bumps equally well at both ends, & sit level with me on it & a full tank of gas, it was time to get it to steer the way I wanted it too. Which would be rock steady at top speed, & razor sharp in the tight stuff. Impossible you say? Read on ! The RMX tends to put the rider slightly rearward of what I think the ideal seating position would be for negotiating a tight slippery corner. Why? Well, it seems that the bars are angled a little rearward, & the stock non-adjustable upper triple clamp, leans the bars back even further. On top of that, they gotta put that three gallons of gas somewhere, so the seat, tends to have a little 'saddle' in it, that prevents the rider from sliding forward as much as I'd like. So, here's how I fixed it. First the hard part, I had to look around a bit, but I finally found a vendor that makes an upper triple clamp for the RMXs 45mm forks. That would be Scotts Performance. They had the, beautifully machined upper triple clamp, bar perches, & upper bar clamp in stock, & to me in a couple of days. I bought a pair of Answer Enduro Bend Pro-Taper bars, & when I had mounted it all, the difference in seating position was amazing! It puts you farther forward, & gives you more room in the cockpit to maneuver. Next I called Ceet about a harder, & taller seat foam. They make one that is in fact harder, & about an inch taller. But here's the thing, The extra height is only in what was the 'saddle' area. The seat height is the same at the front & rear, so the effect is just the flattening of the seating area. In fact, I used the stock seat cover, as I couldn't find another that I liked, & there was nothin' wrong with that one anyway. So now, I've made the seat firmer, & flatter so I can get forward, & The new bars, & triple clamps hold me there. I found that it's also easier on Patman's knees to make the seated to standing transition, as I'm already an inch higher. For the high speed stability, I used a Works Enduro Rider, Steering stabilizer. It mounts down on top of the front fender so it won't hit me in the face, is ...cost effective, easily rebuildable, and it works. The internal valving of the WER unit will always let the front end come back to center with no dampening, but wont allow a rock or headshake to easily pull the front out of center, or out of your hands. Yet it's effects are virtually unnoticeable under normal riding conditions. Now it goes straight at speed, turns on a dime, is not easily deflected from it's intended course, and can run over a small automobile without even feelin the bump...almost.
Next up...Max Power!
|
|
|
|